

Installing a wood stove chimney through a wall may seem like a daunting task, but with the right knowledge and tools, it can be a straightforward and rewarding project. A wood stove is a popular heating option for many homes, as it provides warmth and ambiance while also being more cost-effective than other heating methods. However, for a wood stove to function properly, it must be connected to a chimney that safely vents the smoke and gases outside.
While some may opt for a pre-existing chimney, others may need to install a new one through a wall. This article will guide you through the essential steps and considerations for successfully installing a wood stove chimney through a wall. From understanding building codes to choosing the right materials, we will cover everything you need to know to ensure a safe and efficient installation process. So, whether you are a seasoned DIYer or a first-time homeowner, read on to learn how to install a wood stove chimney through wall and bring warmth and coziness to your home.
How does Chimney work?
Chimneys operate on buoyancy, which results from a temperature difference between the inside air and the outside air. When you ignite a fire in your wood stove, it generates intense heat, causing the surrounding air to warm up. As the hot air rises, it creates an area of low pressure inside the stove. This draws in fresh air through the stove's air intake vents. This oxygen influx fuels combustion.
Simultaneously, hot air, laden with combustion byproducts like smoke and gases, ascends into the chimney. This rising column of hot air creates a pressure differential between the inside and outside of the chimney, with lower pressure at the top. This difference in pressure compels the smoke and gases to travel upward and out of the chimney's flue. As the smoke rises and moves through the chimney, it cools down and loses its buoyancy, eventually exiting the chimney and dispersing safely into the atmosphere. The cooler air inside the chimney also creates a natural draft that pulls fresh air into the wood stove. It ensures a steady supply of oxygen to sustain the fire.
The design and construction of the chimney, along with factors such as its height and insulation, play pivotal roles in its effectiveness. A properly installed chimney is not just a passive conduit but an active system that harnesses natural forces to maintain safe and efficient wood stove operation. The basic understanding of how chimneys work shows the importance of having a properly installed chimney. It allows smoke and gases to escape while encouraging oxygen to flow steadily. It works together to keep your wood stove burning safely and efficiently.
Tools and Materials You'll Need
Before embarking on the installation of a wood stove chimney through a wall, it's vital to gather all the necessary tools and materials to ensure a smooth and efficient process. Here's a more detailed breakdown of what you'll need:
Tools:
- Drill with Masonry Bits: You'll require a high-quality drill with masonry bits to create holes in the wall for securing the chimney components.
- Reciprocating Saw: This tool is indispensable for cutting precise openings in the wall to accommodate the chimney pipe. Ensure you have enough blades, as cutting through masonry can be tough on blades.
- Level: A good level is essential to ensure that the chimney components are installed plumb and level, which is critical for both safety and proper stove operation.
- Tape Measure: Accuracy is key, and a tape measure will help you take precise measurements for the placement of the chimney and wall thimbles.
- Utility Knife: You'll need this for trimming insulation and cutting sealing materials to size.
- Safety Gear: Safety should always come first. Invest in quality gloves and safety goggles to protect yourself from sharp edges, dust, and debris during the installation process.
Materials:
- Chimney Pipes: Choose either single-wall or double-wall chimney pipes, depending on your preference and local building codes. Double-wall pipes provide an extra layer of safety by reducing heat transfer to the surrounding walls.
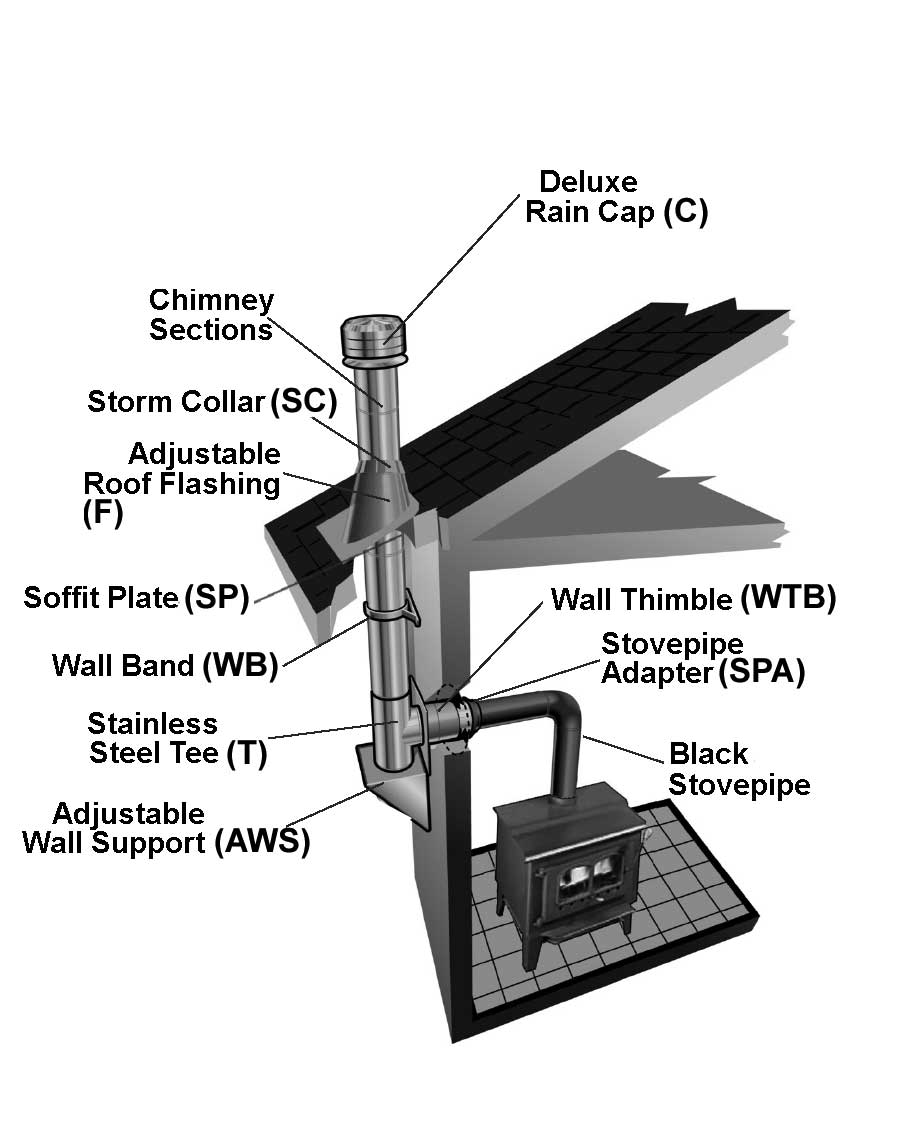
- Wall Thimbles: Wall thimbles are essential components that create a safe and insulated passage for the chimney through the wall. Ensure you choose the appropriate size and type based on your chimney pipe.
- Brackets and Screws: Brackets are used to secure the chimney in place, both on the interior and exterior of the wall. Stainless steel screws are recommended for their durability and corrosion resistance.
- Chimney Cap: A chimney cap is vital to prevent rain, debris, and animals from entering your chimney. It also helps to improve draft efficiency.
- Cutting Tool: In addition to the reciprocating saw, have a cutting tool suitable for the material of your wall (e.g., masonry blade for brick walls) to create clean openings.
- Insulation Materials: You'll need insulation materials like fiberglass insulation or high-temperature ceramic wool insulation to insulate the chimney as it passes through the wall. Proper insulation minimizes heat transfer and ensures safety.
You May Like: pellet stove vs wood stove
Step by Step Guide: How to Install a Wood Stove Chimney Through Wall?
Installing a wood stove chimney through a wall involves a series of intricate steps. Below, we'll provide a more detailed look at the essential stages of this process.
Choosing the Right Location
You should select the best location for your wood stove chimney in order to ensure its efficiency and safety. Identify the location of the wood stove in your room by looking at the layout of the room. The chimney should be as straight and direct as possible while maintaining a minimum clearance from combustible materials, which is usually 18 inches. The shortest path to an exterior wall and wall obstructions are two examples of factors that affect installation ease.
The placement of the chimney within the room should be taken into consideration. A stove should be located in a manner that ensures an efficient distribution of heat. Generally, it is best to place the stove near the center of the room or in an area where it can radiate heat evenly.
Measuring and Marking
An accurate measurement and precise marking are essential to the successful installation of a wood stove chimney. Measure the distance from the center of the chimney collar of the wood stove to the chosen wall through which the chimney will pass. Ensure that this measurement is recorded carefully. On the wall, mark the same distance up, making sure that it aligns exactly with the chosen location for the chimney's penetration. Use a level to create a level line across the wall at this height.
Additionally, consider the required clearance from combustibles when marking the wall. The manufacturer of your wood stove and chimney components will provide specific clearance guidelines. Ensure that the marked chimney path allows for necessary clearances. You are setting the stage for a successful installation by meticulously measuring and marking the area, as these marks will serve as references throughout the installation process.
Cutting the Hole
Cutting the hole through the wall is where the physical work begins in earnest. This step demands precision and care to ensure a clean and accurately sized opening. Use a reciprocating saw with a masonry blade or another suitable cutting tool to follow the level line you previously marked on the wall. Make sure the opening corresponds to the chimney pipe size you'll use. A snug fit here is crucial for the overall integrity of the installation.
While cutting the hole, be cautious of potential obstructions within the wall, such as electrical wires or plumbing. Prior to making any cuts, inspect the area and use a stud finder to identify wall studs. It's essential to avoid cutting through structural components or utilities within the wall. Once the hole is cut, inspect it for any rough or jagged edges and use appropriate tools to smooth them out. This meticulous approach to cutting ensures that your chimney fits securely and neatly through the wall. This minimizes the risk of air leaks or other issues during operation.
Assembling the Chimney Components
Once you have successfully cut the hole in the wall, you must assemble the chimney components. In this step, each piece serves a specific purpose in ensuring the chimney's proper operation, much like the process of assembling a carefully designed puzzle. As chimney systems vary in design and requirements, it is essential to closely follow the manufacturer's instructions.
The most effective way to clean a wood stove is to begin at the base and work your way up. Attach the appropriate chimney pipe sections, which are typically made of durable and airtight materials like stainless steel. For many chimney pipes, a twist-lock mechanism or specialized brackets and screws are required to secure them. As a result, the chimney will be more stable, and smoke will not escape into your home, as well as harmful fumes.
You may need to incorporate other components at this stage, such as wall thimbles, which provide a fire-resistant passageway for the chimney through the wall. You should use a wall thimble that is compatible with your chimney pipe and that is securely anchored to the wall in order to maintain the necessary clearance. It is imperative that you follow every step in this assembly process in order to ensure your wood stove system is safe and efficient.
Attaching the Chimney to the Stove
It is crucial that you pay attention to the point where the chimney connects to the wood stove's flue collar during the installation process. For smoke and combustion gases not to escape into your living space, this connection must not only be secure but also airtight. It is common for chimney systems to provide adapters or connectors designed specifically for this purpose.
It is important to align your chimney pipe with your wood stove's flue collar. You should ensure that the two components are not out of alignment or gapped. According to the manufacturer's instructions, you might need to secure the connection using screws or clamps. It is imperative to create a tight seal here in order to ensure the stove's efficiency and safety.
Insulation and Clearance
For a chimney to be safe, it is imperative to maintain an appropriate level of insulation and clearance throughout its path. Since the chimney passes through the wall, suitable insulation materials must be used to minimize heat transfer to the wall. You must also maintain a sufficient distance between combustible materials.
The most common type of insulation used for this purpose is fiberglass insulation or high-temperature ceramic wool insulation. Make sure the insulation is tightly wrapped around the chimney pipe where it passes through the wall, ensuring that there are no gaps or exposed areas. In addition to improving chimney safety, this insulation also contributes to better draft control.
Ensure that you adhere to the clearance guidelines recommended by the manufacturer of your wood stove and chimney components. By maintaining adequate clearances, you can avoid nearby walls, furniture, or other combustible materials from catching fire due to the heat from the wood stove. You can create a safe and efficient environment for your wood stove by balancing insulation and clearance.
You May Like: Does a Gas Fireplace need a chimney?
Roof Exit Installation
When your wood stove chimney exits through the roof, the installation process requires careful attention to both structural and weatherproofing considerations. When this stage is properly executed, the chimney will be secure and weather-resistant.
The first step is to identify the best exit point on your roof. You should align this point with the chimney's path from inside your home. Use a plumb bob or a level to create a precise mark on the roof's surface. At this point, you'll need to create an opening in the roof that accommodates the chimney. Roof flashing and chimney caps designed for this purpose are essential components of this process.
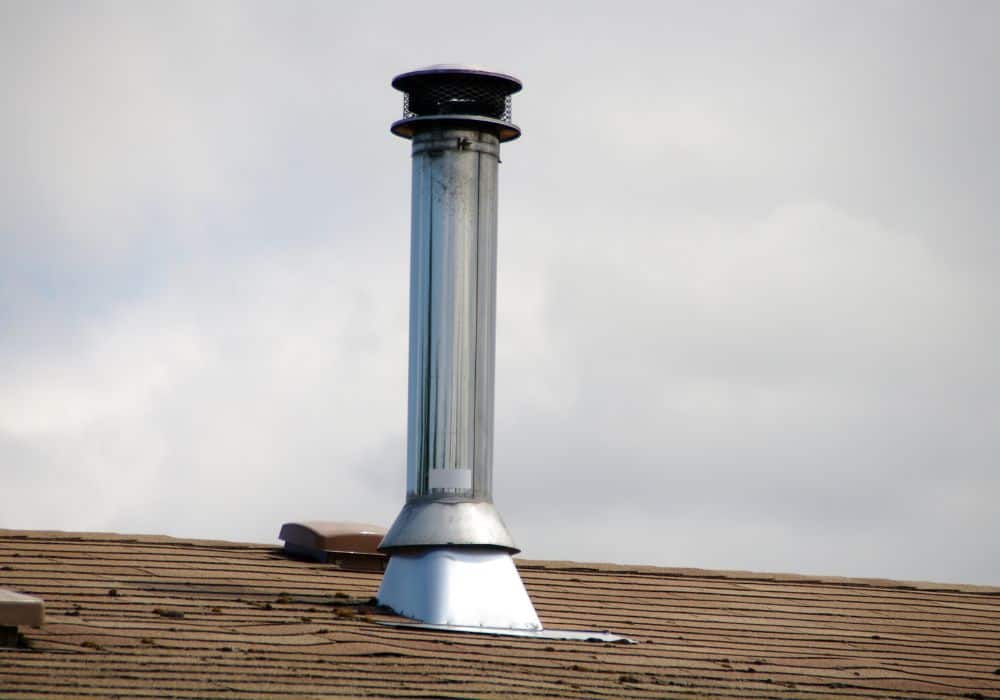
Cutting the roof hole should be done with precision and care. This should include considering the chimney pipe size and ensuring that the opening is appropriately sized. Roof flashing, which typically consists of metal and rubber components, will be installed around the chimney pipe as it penetrates the roof This flashing creates a watertight seal, preventing moisture from entering your home and causing damage.
Sealing and Weatherproofing
A wood stove chimney installation must be sealed and weatherproofed to ensure that it is both safe and resilient to the elements. By following these steps, you can prevent air and moisture infiltration. This can compromise wood stove efficiency and potentially cause damage.
You should inspect all chimney joints, seams, and connections, both inside and outside your home. Any gaps or openings should be sealed using a high-temperature silicone sealant or another approved material designed for chimney installation. As a result of these seals, smoke and fumes are contained and the airtight integrity of the system is maintained.
Furthermore, it is imperative that the chimney cap and other exterior components of the chimney are securely attached and weatherproofed. As well as protecting against downdrafts and backdrafts, the chimney cap also prevents rainwater, debris, and animals from entering the chimney. It is important to ensure that the chimney cap is firmly in place and that it diverts water away from the interior of the chimney.
Testing for Safety
As soon as the wood stove chimney has been installed, it is necessary to conduct thorough safety checks and tests to ensure that it is operating as intended. This step ensures that your wood stove system is safe and enables you to use it with peace of mind.
You should begin by lighting a small, controlled fire on your wood stove. From the moment the fire is ignited until it has completely burned, closely observe the entire system. Keep an eye out for any signs of smoke leaks or drafts. When smoke escapes from your home or odors are detected, it is imperative to address the problem as soon as possible. The presence of smoke leaks can be a sign of inadequate chimney sealing or improper chimney connections.
It is also advisable to use a smoke pencil or smoke pellet to detect air leaks or drafts in addition to visual inspections. You can use these devices to detect air leaks that enter your system by releasing harmless smoke.
Safety Precautions
1. Adequate ClearanceProper clearance is essential. Fires can result from inadequate clearance from combustible things around wood stoves. Stay within local construction requirements, which demand 18 inches of stove space from walls and furniture. For exact clearance distances, consult your stove's manual and local authorities. Safety comes first, so never sacrifice clearance for a nice spot.
2. Fire-Resistant MaterialsEnsure that the area surrounding the wood stove is constructed of fire-resistant materials. Walls and floors near the stove should be made of materials like brick, stone, or specially designed fire-resistant wallboards. Non-combustible floor protection, such as a hearth made of stone or tile, is essential to prevent accidental ignition of the floor beneath the stove. Pay close attention to the fire-rated materials' specifications and ratings to guarantee their suitability for your installation.
3. Smoke Detectors and Fire ExtinguishersInstall smoke detectors near the wood stove installation area and throughout your home. These devices provide an early warning system in case of smoke or fire, allowing you to respond quickly. Additionally, keep fire extinguishers readily accessible. Class A fire extinguishers are suitable for wood stove fires, but ensure that everyone in your household knows how to use them safely. Conduct regular checks of smoke detectors and ensure that fire extinguishers are fully charged and in working order.
Conclusion
Installing a wood stove chimney through a wall requires careful planning and adherence to safety regulations. It is important to consult a professional and obtain any necessary permits before beginning the installation process. By following the proper steps and using high-quality materials, you can ensure a safe and efficient wood stove chimney that will provide warmth and comfort for years to come. Remember to regularly maintain and inspect your chimney to keep it in good working condition. With the proper care, your wood stove chimney installation will be a successful and valuable addition to your home.
Frequently Asked Questions (FAQs)
1. How long does it take to install a wood stove chimney through a wall?
The installation time can vary significantly depending on factors like chimney complexity and your level of experience. On average, plan for a day or two of work with proper planning and preparation.
2. Can I install a wood stove chimney myself, or should I hire a professional?
While it's possible to undertake a DIY installation, it's advisable to consult a professional, particularly if you lack experience in chimney installation. Professionals can ensure safety and compliance with local codes, providing peace of mind.
3. What type of chimney pipe is best for a wood stove?
Stainless steel chimney pipes, especially double-wall insulated pipes, are highly recommended for their durability and resistance to corrosion. They provide a safer and more efficient chimney solution for wood stoves.
4. Is a building permit required for chimney installation?
In many areas, a building permit is indeed required for chimney installation. Always check with your local authorities to ensure compliance with regulations before starting the installation process.
5. How often should I clean my wood stove chimney?
Regular chimney cleaning is essential to prevent creosote buildup and maintain safety. It's typically recommended to clean your chimney at least once a year, but consider more frequent cleaning if you use your wood stove heavily or notice excessive creosote buildup.